Introduction
socktop is a TUI-first remote system monitor built with Rust. Two components:
- socktop (TUI Client) - A terminal-based user interface for viewing system metrics
- socktop-agent - A lightweight background service that collects and serves system metrics over WebSocket
Features
- TUI built with ratatui, Catppuccin Frappe theme
- CPU: overall sparkline + per-core bars, accurate per-process CPU% (normalized 0-100%)
- Memory/Swap gauges
- Disks: per-device usage
- Network: per-interface throughput with sparklines
- Temperatures: CPU (optional)
- Top processes (top 50): sortable by CPU% or memory, scrollable
- Optional GPU metrics
- Remote monitoring via WebSocket (JSON over WS)
- Optional WSS (TLS): agent auto-generates self-signed cert on first run, client pins cert via –tls-ca/-t
- Optional auth token
- Connection profiles for quick access to saved hosts
- Built-in demo mode (–demo)
Architecture
socktop uses a client-server architecture:
┌─────────────────┐         WebSocket          ┌──────────────────┐
│                 │ ◄────────────────────────► │                  │
│  socktop (TUI)  │    (with TLS optional)     │  socktop-agent   │
│     Client      │                            │   (Background)   │
│                 │                            │                  │
└─────────────────┘                            └──────────────────┘
        │                                               │
        │                                               │
        ▼                                               ▼
  User Terminal                                  System Metrics
  Local or Remote                                (sysinfo crate)
The agent runs on each system you want to monitor, collecting metrics using the sysinfo crate. The client connects to one or more agents to display real-time system information.
Quick Demo
socktop --demo
Spins up a temporary local agent on port 3231 and connects to it. Stops automatically when you quit.
Use Cases
- Remote server monitoring
- Homelab / Raspberry Pi cluster monitoring
- Development / testing resource usage
- Custom dashboards via
socktop_connectorlibrary
Project Status
socktop is actively maintained and used in production environments. The project follows semantic versioning and maintains backward compatibility within major versions.
- Current Version: 1.50.x
- Minimum Rust Version: 1.70+
- Supported Platforms: Linux (amd64, arm64, armhf, riscv64)
- License: MIT
Community and Support
- GitHub Repository: https://github.com/jasonwitty/socktop
- Issue Tracker: Report bugs and request features on GitHub
- crates.io:
- socktop - TUI client
- socktop-agent - Background agent
- socktop-connector - Library for integrations
- APT Repository: https://jasonwitty.github.io/socktop/
Next Steps
See Quick Start for installation.
Quick Start
Installation Methods
socktop can be installed via APT (Debian/Ubuntu), Cargo, or built from source.
Option 1: APT Installation (Recommended for Debian/Ubuntu)
Debian/Ubuntu installation:
# Add the repository's GPG signing key
curl -fsSL https://jasonwitty.github.io/socktop/KEY.gpg | \
    sudo gpg --dearmor -o /usr/share/keyrings/socktop-archive-keyring.gpg

# Add the APT repository
echo "deb [signed-by=/usr/share/keyrings/socktop-archive-keyring.gpg] https://jasonwitty.github.io/socktop stable main" | \
    sudo tee /etc/apt/sources.list.d/socktop.list

# Update the package list
sudo apt update

# Install socktop and the agent
sudo apt install socktop socktop-agent

# Enable the agent service
sudo systemctl enable --now socktop-agent
Run socktop to monitor your local system or connect to remote agents.
Option 2: Cargo Installation
Install from crates.io:
# Install GPU support libraries (required)
sudo apt install libdrm-dev libdrm-amdgpu1

# Install the TUI client
cargo install socktop

# Install the agent
cargo install socktop-agent

# Run the agent manually or set up as a service (see Agent Service Setup)
socktop_agent
Demo Mode
Test socktop without setting up an agent:
# If you have socktop installed
socktop --demo

# Or just run socktop with no arguments and select 'demo' from the interactive menu
socktop
This spins up a temporary local agent on port 3231, connects to it, and stops when you quit (Ctrl-C or q).
Usage
# Quick demo (no agent setup needed)
socktop --demo

# Monitor your local system (requires agent running)
socktop

# Or connect to a remote agent
socktop ws://hostname:3000/ws
The TUI displays system metrics in real-time.
Interactive Profile Selection
If you run socktop with no arguments, you’ll see an interactive menu:
Select profile:
  1. prod
  2. dev-server
  3. demo
Enter number (or blank to abort):
- Choose a numbered profile to connect to a saved server
- Select
demoto launch demo mode (always available) - Press Enter on blank to abort
Monitoring Remote Systems
To monitor a remote system:
- Install the agent on the target system (using APT or Cargo)
- Start the agent on the remote system:
# Via systemd (APT install) sudo systemctl start socktop-agent # Or manually socktop_agent - Connect from your client:
socktop ws://remote-hostname:3000/ws
Save frequently used connections as profiles. See Connection Profiles.
Prerequisites
Supported Operating Systems
- Debian 10+
- Ubuntu 20.04+
- Arch Linux (latest)
- Fedora 35+
- Raspberry Pi OS
- Other Linux distributions with kernel 4.15+
- Windows 10+ (Binaries available in build artifacts)
Supported Architectures
- amd64 (x86_64)
- arm64 (aarch64) - Raspberry Pi 4, AWS Graviton
- armhf (ARMv7) - Raspberry Pi 3
- riscv64 (experimental)
Software Dependencies
GPU support requires additional libraries:
sudo apt update
sudo apt install libdrm-dev libdrm-amdgpu1
For Cargo Installation
1. Rust Toolchain
Rust 1.70+ required.
# Install Rust via rustup (recommended)
curl --proto '=https' --tlsv1.2 -sSf https://sh.rustup.rs | sh

# Verify installation
rustc --version
cargo --version

# Update if needed
rustup update
2. Build Dependencies
Debian/Ubuntu:
sudo apt install build-essential pkg-config libssl-dev libdrm-dev libdrm-amdgpu1
Fedora:
sudo dnf install gcc pkg-config openssl-devel
Arch Linux:
sudo pacman -S base-devel openssl
Install via Cargo
Installing socktop via Cargo gives you access to the latest version and works on any Linux distribution with Rust installed.
Prerequisites
Before installing via Cargo, ensure you have:
- Rust 1.70 or newer - Install via rustup
- Build dependencies - See Prerequisites for details
- GPU support libraries - Required on all systems:
sudo apt install libdrm-dev libdrm-amdgpu1
Installation
Installing the TUI Client
cargo install socktop
This will download, compile, and install the socktop binary to ~/.cargo/bin/. Make sure this directory is in your PATH.
Installing the Agent
cargo install socktop-agent
This installs the socktop_agent binary to ~/.cargo/bin/.
Installing Both (Recommended)
cargo install socktop socktop-agent
Verify Installation
Check that the binaries are installed correctly:
# Check socktop client
socktop --version

# Check socktop agent
socktop_agent --version
You should see output like:
socktop 1.50.2
First Run
Start the Agent
Start the agent in a separate terminal or background process:
# Run in foreground (for testing)
socktop_agent

# Run in background
socktop_agent &

# Or with custom options
socktop_agent --port 3000 --host 0.0.0.0
Connect with the Client
In another terminal, connect to the agent:
# Monitor local system
socktop

# Or explicitly specify the WebSocket URL
socktop ws://localhost:3000
Configuration
Agent Configuration
The agent accepts the following command-line arguments:
socktop_agent --help
Common options:
--port <PORT>- Port to listen on (default: 3000)--host <HOST>- Host/IP to bind to (default: 0.0.0.0)--token <TOKEN>- Authentication token (optional)--tls-cert <CERT>- TLS certificate path (optional)--tls-key <KEY>- TLS private key path (optional)
Example with custom configuration:
socktop_agent --port 8080 --token mySecretToken123
Client Configuration
The client can connect using various methods:
# Local connection
socktop

# Remote connection
socktop ws://192.168.1.100:3000

# Secure connection with TLS
socktop wss://secure-host:3000

# Using a connection profile
socktop -P my-server
See Configuration for details on setting up profiles.
System-wide agent (Linux)
# If you installed with cargo, binaries are in ~/.cargo/bin
sudo install -o root -g root -m 0755 "$HOME/.cargo/bin/socktop_agent" /usr/local/bin/socktop_agent

# Install and enable the systemd service (example unit in docs/)
sudo install -o root -g root -m 0644 docs/socktop-agent.service /etc/systemd/system/socktop-agent.service
sudo systemctl daemon-reload
sudo systemctl enable --now socktop-agent
Install via APT
The easiest way to install socktop on Debian and Ubuntu systems is through the official APT repository.
Supported Systems
The APT repository supports:
- Debian 10+ (Buster and newer)
- Ubuntu 20.04+ (Focal and newer)
- Raspberry Pi OS (Debian-based)
- Other Debian derivatives
Supported Architectures
- amd64 (x86_64)
- arm64 (aarch64)
- armhf (ARMv7)
- riscv64 (experimental)
Installation
Step 1: Add GPG Signing Key
First, add the repository’s GPG signing key to verify package authenticity:
curl -fsSL https://jasonwitty.github.io/socktop/KEY.gpg | \
    sudo gpg --dearmor -o /usr/share/keyrings/socktop-archive-keyring.gpg
This ensures that packages are cryptographically verified before installation.
Step 2: Add APT Repository
Add the socktop repository to your system’s sources list:
echo "deb [signed-by=/usr/share/keyrings/socktop-archive-keyring.gpg] https://jasonwitty.github.io/socktop stable main" | \
    sudo tee /etc/apt/sources.list.d/socktop.list
Step 3: Update Package Lists
Refresh your package cache to include the new repository:
sudo apt update
Step 4: Install Packages
Install socktop and the agent:
# Install both client and agent
sudo apt install socktop socktop-agent

# Or install individually
sudo apt install socktop        # TUI client only
sudo apt install socktop-agent  # Agent only
Automatic Service Setup
The APT package automatically configures the agent as a systemd service, but it’s not enabled by default.
Enable and Start the Agent
# Enable the service to start at boot
sudo systemctl enable socktop-agent

# Start the service now
sudo systemctl start socktop-agent

# Or do both in one command
sudo systemctl enable --now socktop-agent
Check Service Status
# View service status
sudo systemctl status socktop-agent

# View service logs
sudo journalctl -u socktop-agent -f

# View recent logs
sudo journalctl -u socktop-agent -n 50
Control the Service
# Stop the service
sudo systemctl stop socktop-agent

# Restart the service
sudo systemctl restart socktop-agent

# Disable auto-start
sudo systemctl disable socktop-agent
Agent Service Setup
APT Installation
If you installed via APT, the service is already configured:
sudo systemctl enable --now socktop-agent
Cargo Installation
System-wide agent setup:
# If you installed with cargo, binaries are in ~/.cargo/bin
sudo install -o root -g root -m 0755 "$HOME/.cargo/bin/socktop_agent" /usr/local/bin/socktop_agent

# Install and enable the systemd service (example unit in docs/)
sudo install -o root -g root -m 0644 docs/socktop-agent.service /etc/systemd/system/socktop-agent.service
sudo systemctl daemon-reload
sudo systemctl enable --now socktop-agent
Enable SSL
# Stop service
sudo systemctl stop socktop-agent

# Edit service to append SSL option and port
sudo nano /etc/systemd/system/socktop-agent.service

# Change ExecStart line to:
# ExecStart=/usr/local/bin/socktop_agent --enableSSL --port 8443

# Reload
sudo systemctl daemon-reload

# Restart
sudo systemctl start socktop-agent

# Check logs for certificate location
sudo journalctl -u socktop-agent -f

# Example output:
# Aug 22 22:25:26 rpi-master socktop_agent[2913998]: socktop_agent: generated self-signed TLS certificate at /var/lib/socktop/.config/socktop_agent/tls/cert.pem
Configuration
Agent configuration via command-line flags or environment variables:
Port:
- Flag:
--port 8080or-p 8080 - Positional:
socktop_agent 8080 - Env:
SOCKTOP_PORT=8080
TLS (self-signed):
- Enable:
--enableSSL - Default TLS port: 8443 (override with
--port/-p) - Certificate/Key location (created on first TLS run):
- Linux (XDG):
$XDG_CONFIG_HOME/socktop_agent/tls/{cert.pem,key.pem}(defaults to~/.config) - The agent prints these paths on creation
- Linux (XDG):
Auth token (optional): SOCKTOP_TOKEN=changeme
Disable GPU metrics: SOCKTOP_AGENT_GPU=0
Disable CPU temperature: SOCKTOP_AGENT_TEMP=0
Managing the Service
Basic Commands
# Start the service
sudo systemctl start socktop-agent

# Stop the service
sudo systemctl stop socktop-agent

# Restart the service
sudo systemctl restart socktop-agent

# Reload configuration (if supported)
sudo systemctl reload socktop-agent

# View service status
sudo systemctl status socktop-agent

# Enable auto-start on boot
sudo systemctl enable socktop-agent

# Disable auto-start on boot
sudo systemctl disable socktop-agent

# Enable and start in one command
sudo systemctl enable --now socktop-agent
Logs
# Follow live logs
sudo journalctl -u socktop-agent -f

# View recent logs
sudo journalctl -u socktop-agent -n 50
Status
# Check status
sudo systemctl status socktop-agent --no-pager

# Is the service running?
sudo systemctl is-active socktop-agent
Updating
# On the server running the agent
cargo install socktop_agent --force
sudo systemctl stop socktop-agent
sudo install -o root -g root -m 0755 "$HOME/.cargo/bin/socktop_agent" /usr/local/bin/socktop_agent
# If you changed the unit file:
# sudo install -o root -g root -m 0644 docs/socktop-agent.service /etc/systemd/system/socktop-agent.service
# sudo systemctl daemon-reload
sudo systemctl start socktop-agent
sudo systemctl status socktop-agent --no-pager
Tip: If only the binary changed, restart is enough. If the unit file changed, run sudo systemctl daemon-reload.
Upgrading
This guide covers upgrading socktop and socktop-agent to newer versions.
Upgrading via APT
Standard Upgrade
The easiest method - upgrade through normal system updates:
# Update package lists
sudo apt update

# Upgrade socktop packages
sudo apt upgrade socktop socktop-agent

# Or upgrade entire system
sudo apt upgrade
The service will automatically restart after the upgrade.
Verify Upgrade
# Check new versions
socktop --version
socktop_agent --version

# Check service status
sudo systemctl status socktop-agent

## Upgrading via Cargo

### Update from crates.io

```bash
# Update client
cargo install socktop --force

# Update agent
# on the server running the agent
cargo install socktop_agent --force
sudo systemctl stop socktop-agent
sudo install -o root -g root -m 0755 "$HOME/.cargo/bin/socktop_agent" /usr/local/bin/socktop_agent
# if you changed the unit file:
# sudo install -o root -g root -m 0644 docs/socktop-agent.service /etc/systemd/system/socktop-agent.service
# sudo systemctl daemon-reload
sudo systemctl start socktop-agent
sudo systemctl status socktop-agent --no-pager
# logs:
# journalctl -u socktop-agent -f
General Usage
Starting socktop
Demo Mode
Try socktop without any setup:
# Launch demo mode
socktop --demo
Starts a temporary local agent on port 3231, connects to it, and monitors your local system. The agent stops when you quit (you’ll see “Stopped demo agent on port 3231”).
Interactive Mode
Run socktop with no arguments to see an interactive profile menu (if you have saved profiles):
Select profile:
  1. prod
  2. dev-server
  3. demo
Enter number (or blank to abort):
Select a number to connect, or choose demo (always available). Press Enter on blank to abort.
Monitor Remote System
Connect to a remote agent by specifying the WebSocket URL:
socktop ws://hostname:3000/ws
socktop ws://192.168.1.100:3000/ws
socktop wss://secure-host:8443/ws  # With TLS
Using Connection Profiles
For frequently monitored systems, use profiles:
# Use a saved profile
socktop -P production-server
socktop -P rpi-cluster-01

# List available profiles
socktop --list-profiles
See Connection Profiles.
Keyboard and Mouse
Keyboard
- Quit:
qorEsc
Mouse (Processes pane)
- Click “CPU %” to sort by CPU descending
- Click “Mem” to sort by memory descending
- Mouse wheel: scroll
- Drag scrollbar: scroll
- Arrow/PageUp/PageDown/Home/End: scroll
Filtering Processes
Press / to enter filter mode:
Filter: pyth_
This will show only processes matching “pyth” (case-insensitive). Press ESC to clear filter.
Command Line Options
Client Options
socktop [OPTIONS] [URL]

OPTIONS:
  -P, --profile <PROFILE>              Use a connection profile
  -t, --token <TOKEN>                  Authentication token
  --tls-ca <FILE>                      CA certificate for TLS verification
  --verify-hostname                    Enable strict hostname verification for TLS
  --metrics-interval-ms <MS>           Fast metrics polling interval (default: 500)
  --processes-interval-ms <MS>         Process list polling interval (default: 2000)
  --list-profiles                      List available connection profiles
  -h, --help                           Show help information
  -V, --version                        Show version information

ARGUMENTS:
  [URL]                     WebSocket URL (e.g., ws://host:3000)
Examples
# Connect with custom intervals
socktop ws://server:3000 --metrics-interval-ms 750 --processes-interval-ms 3000

# Connect with authentication token
socktop ws://server:3000 -t mySecretToken

# Connect with TLS and custom CA
socktop wss://server:3000 --tls-ca /path/to/ca.pem

# Connect with TLS and hostname verification
socktop wss://server:3000 --tls-ca /path/to/ca.pem --verify-hostname
Connection Profiles
Connection profiles allow you to save frequently used agent connections for quick access.
What are Connection Profiles?
Instead of typing the full WebSocket URL every time:
socktop ws://production-server.example.com:3000
You can save it as a profile and use:
socktop -P production
Profile Configuration File
Profiles are stored in ~/.config/socktop/profiles.json (or $XDG_CONFIG_HOME/socktop/profiles.json).
Basic Profile Format
{
  "profiles": {
    "production": {
      "url": "ws://production-server:3000/ws"
    },
    "dev": {
      "url": "ws://dev-server:3000/ws"
    },
    "rpi": {
      "url": "ws://192.168.1.100:3000/ws"
    }
  },
  "version": 0
}
Profile with Authentication
{
  "profiles": {
    "secure-server": {
      "url": "wss://secure.example.com:3000/ws?token=your-secret-token-here"
    }
  },
  "version": 0
}
Note: Tokens are passed as query parameters in the URL.
Profile with TLS Configuration
{
  "profiles": {
    "tls-server": {
      "url": "wss://tls-server.example.com:8443/ws",
      "tls_ca": "/path/to/cert.pem"
    }
  },
  "version": 0
}
Profile with All Options
{
  "profiles": {
    "full-config": {
      "url": "wss://example.com:8443/ws?token=secret-token",
      "tls_ca": "/etc/socktop/cert.pem",
      "metrics_interval_ms": 750,
      "processes_interval_ms": 3000
    }
  },
  "version": 0
}
Note: Custom intervals are optional. Values below 100ms (metrics) or 200ms (processes) are clamped.
Creating Profiles
Method 1: Manual Creation
Create or edit the profiles file:
mkdir -p ~/.config/socktop
nano ~/.config/socktop/profiles.json
Add your profiles:
{
  "profiles": {
    "homelab": {
      "url": "ws://192.168.1.50:3000/ws"
    },
    "cloud-server": {
      "url": "wss://cloud.example.com:8443/ws?token=abc123xyz",
      "tls_ca": "/home/user/.config/socktop/cloud-cert.pem"
    }
  },
  "version": 0
}
Method 2: Automatic Profile Creation
When you specify a new --profile/-P name with a URL (and optional --tls-ca), it’s saved automatically:
# First connection creates and saves the profile
socktop --profile prod ws://prod-host:3000/ws

# With TLS pinning
socktop --profile prod-tls --tls-ca /path/to/cert.pem wss://prod-host:8443/ws

# With custom intervals
socktop --profile fast --metrics-interval-ms 250 --processes-interval-ms 1000 ws://host:3000/ws
To overwrite an existing profile without prompt, use --save:
socktop --profile prod --save ws://new-host:3000/ws
Using Profiles
Basic Usage
# Use a saved profile
socktop -P production
socktop --profile homelab
Keyboard and Mouse Controls
Keyboard
Global
- Quit:
qorEsc - About:
a - Help:
h
Processes
/- Start fuzzy searchc- Clear search filter↑/↓- NavigateEnter- Open detailsx- Clear selection
Search (after /)
- Type - Enter query (fuzzy match)
↑/↓- Navigate resultsEsc- CancelEnter- Apply filter
CPU Per-Core
←/→- Scroll coresPgUp/PgDn- Page up/downHome/End- Jump to first/last
Process Details
x- Closep- Navigate to parentj/k- Scroll threads ↓/↑d/u- Scroll threads (10 lines)[/]- Scroll journalEsc/Enter- Close
Modal Navigation
Tab/→- Next buttonShift+Tab/←- Previous buttonEnter- ConfirmEsc- Cancel
Mouse (Processes pane)
- Click “CPU %” to sort by CPU descending
- Click “Mem” to sort by memory descending
- Mouse wheel: scroll
- Drag scrollbar: scroll
- Arrow/PageUp/PageDown/Home/End: scroll
Configuration
This guide covers all configuration options for socktop client and agent.
Client Configuration
Configuration File Location
By default, socktop looks for configuration in:
- Linux:
~/.config/socktop/ - Custom: Set
XDG_CONFIG_HOMEenvironment variable
Command-Line Options
socktop_agent --help

OPTIONS:
    --port <PORT>              Port to listen on [default: 3000]
    --host <HOST>              Host/IP to bind to [default: 0.0.0.0]
    --token <TOKEN>            Authentication token (optional)
    --tls-cert <FILE>          TLS certificate path (optional)
    --tls-key <FILE>           TLS private key path (optional)
    --log-level <LEVEL>        Log level: error, warn, info, debug, trace
    --cache-duration <MS>      Metrics cache duration in milliseconds [default: 1000]
    --max-processes <NUM>      Maximum processes to report [default: 100]
    --enable-journald          Enable journald log collection
    --journald-lines <NUM>     Number of journal lines to keep [default: 1000]
Configuration File (APT Installation)
Edit /etc/default/socktop-agent:
# Port configuration
PORT=3000

# Bind address (0.0.0.0 for all interfaces, 127.0.0.1 for local only)
HOST=0.0.0.0

# Authentication token
# Uncomment and set for token-based auth
# TOKEN=your-secret-token-here

# TLS configuration
# Uncomment to enable TLS
# TLS_CERT=/etc/socktop/cert.pem
# TLS_KEY=/etc/socktop/key.pem

# Log level (error, warn, info, debug, trace)
LOG_LEVEL=info

# Cache duration (milliseconds)
CACHE_DURATION=1000

# Maximum processes to report
MAX_PROCESSES=100

# Enable journald collection
ENABLE_JOURNALD=false

# Additional options
# OPTIONS="--some-option --another-option"
After editing, restart the service:
sudo systemctl restart socktop-agent
Environment Variables (debugging)
Override settings with environment variables:
# Refresh rate
export SOCKTOP_REFRESH_RATE=2000

# Default profile
export SOCKTOP_DEFAULT_PROFILE=production

# Config directory
export SOCKTOP_CONFIG_DIR=~/.config/socktop

# Disable TLS verification (not recommended)
export SOCKTOP_NO_VERIFY_TLS=1

# Authentication token
export SOCKTOP_TOKEN=your-secret-token
Agent Environment Variables (debugging)
# Port
export SOCKTOP_AGENT_PORT=3000

# Host
export SOCKTOP_AGENT_HOST=0.0.0.0

# Token
export SOCKTOP_AGENT_TOKEN=secret

# TLS cert path
export SOCKTOP_AGENT_TLS_CERT=/path/to/cert.pem

# TLS key path
export SOCKTOP_AGENT_TLS_KEY=/path/to/key.pem

# Log level
export SOCKTOP_AGENT_LOG_LEVEL=info
Authentication Token
This guide covers token-based authentication for securing socktop agent connections.
- Access Control - Only authorized clients can connect
- Security - Prevent unauthorized monitoring of your systems
- Auditability - Track which tokens are in use
- Flexibility - Revoke and rotate tokens as needed
Configuring Token Authentication
Agent Configuration
APT Installation
Edit /etc/default/socktop-agent:
sudo nano /etc/default/socktop-agent
Add your token:
# Authentication token
TOKEN=7KJ9m3LnP4qR8sT2vW5xY6zA1bC3dE4fG7hI9jK0lM8=
Restart the service:
sudo systemctl restart socktop-agent
Cargo Installation
Start the agent with the token:
socktop_agent --token "7KJ9m3LnP4qR8sT2vW5xY6zA1bC3dE4fG7hI9jK0lM8="
Or with systemd service:
sudo systemctl edit socktop-agent
Add environment variable:
[Service]
Environment="TOKEN=7KJ9m3LnP4qR8sT2vW5xY6zA1bC3dE4fG7hI9jK0lM8="
sudo systemctl daemon-reload
sudo systemctl restart socktop-agent
Client Configuration
Command Line
# Pass token via command line
socktop ws://server:3000 -t "7KJ9m3LnP4qR8sT2vW5xY6zA1bC3dE4fG7hI9jK0lM8="
Connection Profile
Add token to profile (~/.config/socktop/profiles.json):
{
  "profiles": {
    "secure-server": {
      "url": "ws://server.example.com:3000/ws?token=7KJ9m3LnP4qR8sT2vW5xY6zA1bC3dE4fG7hI9jK0lM8="
    }
  },
  "version": 0
}
Then connect:
socktop -P secure-server
Environment Variable
# Set token in environment
export SOCKTOP_TOKEN="7KJ9m3LnP4qR8sT2vW5xY6zA1bC3dE4fG7hI9jK0lM8="

# Connect without specifying token
socktop ws://server:3000
TLS Configuration
Secure your socktop agent connections with TLS/SSL encryption.
Enable TLS (Auto-Generated Certificate)
The agent automatically generates a self-signed certificate on first run when you enable TLS:
# The agent will auto-generate cert and key on first TLS run
socktop_agent --enableSSL --port 8443
The certificate is stored at:
- Linux (XDG):
$XDG_CONFIG_HOME/socktop_agent/tls/cert.pem(defaults to~/.config/socktop_agent/tls/) - The agent prints the certificate location on first run
Example output:
socktop_agent: generated self-signed TLS certificate at /home/user/.config/socktop_agent/tls/cert.pem
Optional: Custom SANs (Subject Alternative Names)
To include additional IPs or hostnames in the auto-generated certificate:
SOCKTOP_AGENT_EXTRA_SANS="192.168.1.101,myhost.internal" socktop_agent --enableSSL --port 8443
This prevents NotValidForName errors when connecting via IPs not in the default SAN list.
Systemd Service with TLS
Edit /etc/systemd/system/socktop-agent.service:
[Service]
ExecStart=/usr/local/bin/socktop_agent --enableSSL --port 8443
Reload and restart:
sudo systemctl daemon-reload
sudo systemctl restart socktop-agent

# Check logs for certificate location
sudo journalctl -u socktop-agent -f
Connect with Client
Copy the auto-generated certificate from the agent to your client machine:
# Copy certificate from agent host
scp user@agent-host:~/.config/socktop_agent/tls/cert.pem ~/socktop-agent-cert.pem
Connect with certificate pinning:
# Connect with TLS and pin the server certificate
socktop --tls-ca ~/socktop-agent-cert.pem wss://hostname:8443/ws

# Short form
socktop -t ~/socktop-agent-cert.pem wss://hostname:8443/ws
Note: Providing --tls-ca/-t automatically upgrades ws:// to wss:// if you forget the protocol.
Example Profile with SSL
socktop wss://server:3000
Profile:
File: /home/jasonw/.config/socktop/profiles.json
{
  "profiles": {
    "local": {
      "url": "ws://127.0.0.1:3000/ws"
    },
    "rpi-master": {
      "url": "wss://rpi-master:8443/ws",
      "tls_ca": "/home/jasonw/.config/socktop/rpi-master.pem",
      "metrics_interval_ms": 1000,
      "processes_interval_ms": 5000
    },
    "rpi-worker-1": {
      "url": "wss://192.168.1.102:8443/ws",
      "tls_ca": "/home/jasonw/.config/socktop/rpi-worker-1.pem",
      "metrics_interval_ms": 1000,
      "processes_interval_ms": 5000
    },
    "rpi-worker-2": {
      "url": "ws://192.168.1.103:8443/ws",
      "tls_ca": "/home/jasonw/.config/socktop/rpi-worker-2.pem",
      "metrics_interval_ms": 1000,
      "processes_interval_ms": 5000
    },
    "rpi-worker-3": {
      "url": "ws://192.168.1.104:8443/ws",
      "tls_ca": "/home/jasonw/.config/socktop/rpi-worker-3.pem",
      "metrics_interval_ms": 1000,
      "processes_interval_ms": 5000
    }
  },
  "version": 0
}
Monitor Multiple Hosts with tmux
Use tmux to show multiple socktop instances in a single terminal.
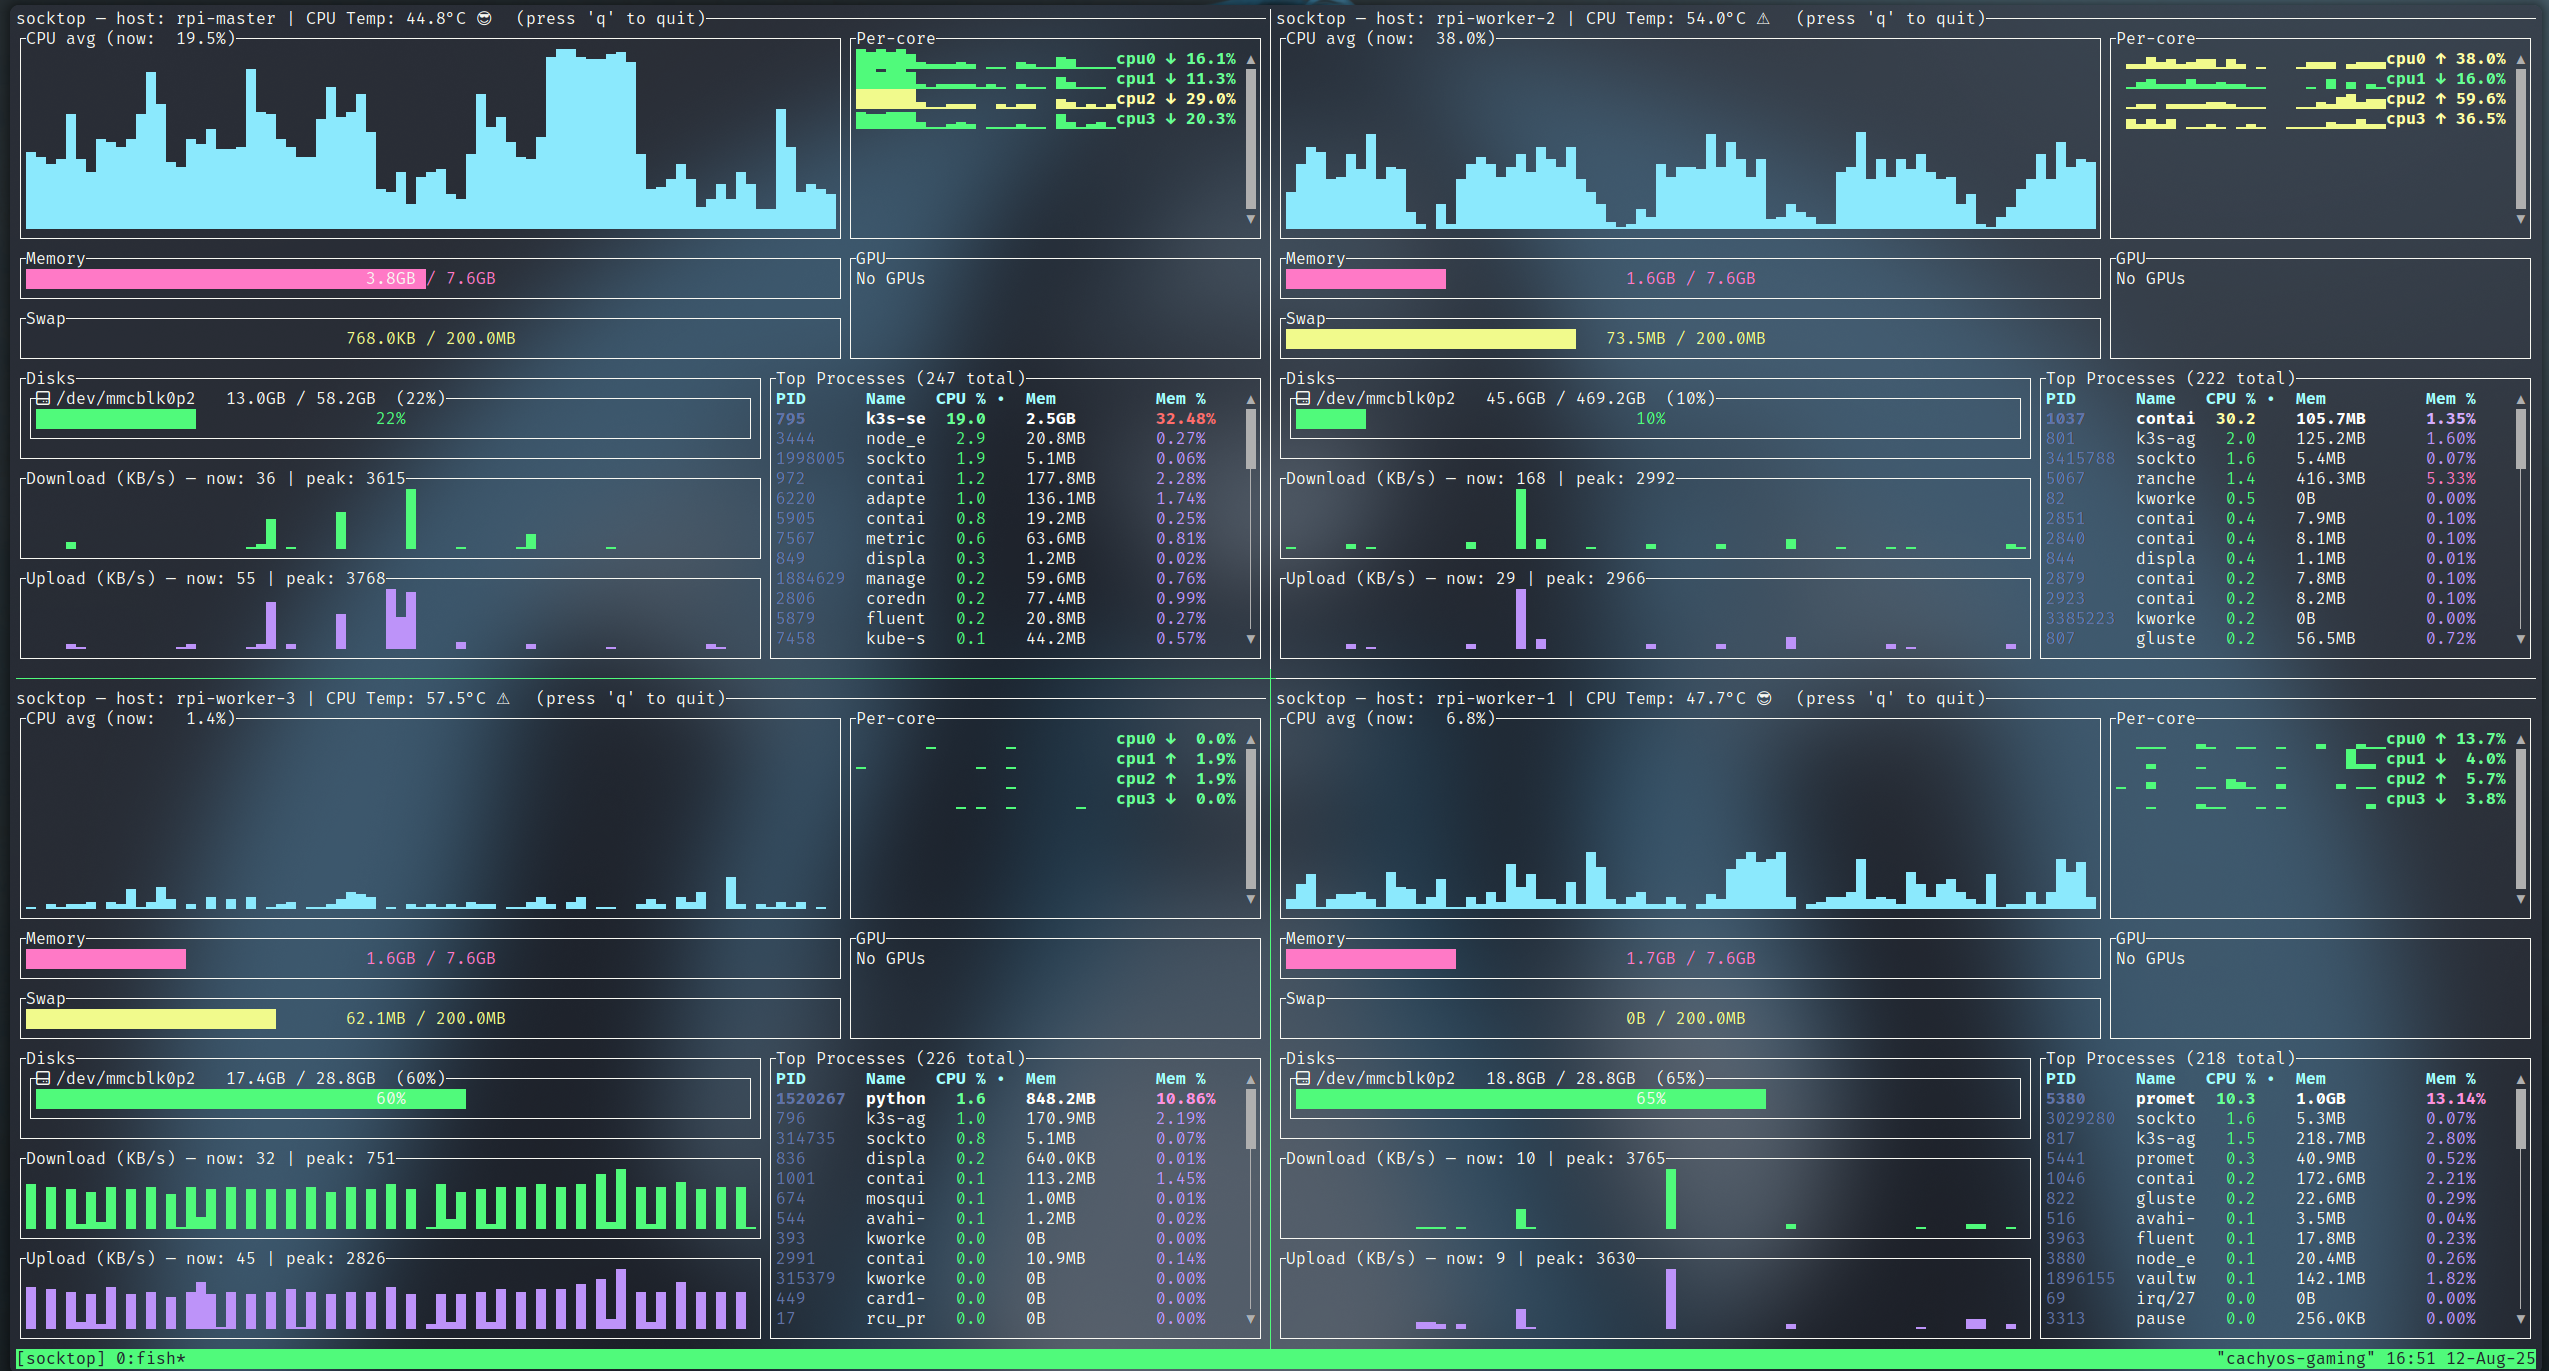 monitoring 4 Raspberry Pis using Tmux
Prerequisites
Install tmux:
# Ubuntu/Debian
sudo apt-get install tmux
Two panes (left/right)
This creates a session named “socktop”, splits it horizontally, and starts two socktops.
tmux new-session -d -s socktop 'socktop ws://HOST1:3000/ws' \; \
  split-window -h 'socktop ws://HOST2:3000/ws' \; \
  select-layout even-horizontal \; \
  attach
Four panes (2x2 grid)
This creates a 2x2 grid with one socktop per pane.
tmux new-session -d -s socktop 'socktop ws://HOST1:3000/ws' \; \
  split-window -h 'socktop ws://HOST2:3000/ws' \; \
  select-pane -t 0 \; split-window -v 'socktop ws://HOST3:3000/ws' \; \
  select-pane -t 1 \; split-window -v 'socktop ws://HOST4:3000/ws' \; \
  select-layout tiled \; \
  attach
Tips
- Replace HOST1..HOST4 (and ports) with your targets
- Reattach later:
tmux attach -t socktop
Key bindings (defaults)
- Split left/right:
Ctrl-b % - Split top/bottom:
Ctrl-b " - Move between panes:
Ctrl-b+ Arrow keys - Show pane numbers:
Ctrl-b q - Close a pane:
Ctrl-b x - Detach from session:
Ctrl-b d
More Info
For detailed tmux documentation, see the tmux GitHub.
Monitor Multiple Hosts with Zellij
Use Zellij to monitor multiple socktop instances in a single terminal.
Installation
cargo install zellij
Example Layout
Create socktop-layout.kdl:
layout {
  pane split_direction="vertical" {
    pane command="socktop" {
      args "-P" "rpi-master"
    }
    pane command="socktop" {
      args "-P" "rpi-worker-1"
    }
  }
  pane split_direction="vertical" {
    pane command="socktop" {
      args "-P" "rpi-worker-2"
    }
    pane command="socktop" {
      args "-P" "rpi-worker-3"
    }
  }
}
Run it:
zellij --layout socktop-layout.kdl
More Info
For detailed Zellij documentation, see Zellij.
Create ~/.config/zellij/layouts/socktop-monitoring.kdl:
layout {
    pane_template name="socktop_pane" {
        command "socktop"
        args "-P" "{profile}"
    }

    pane split_direction="vertical" {
        pane split_direction="horizontal" {
            socktop_pane profile="production-web"
            socktop_pane profile="production-db"
        }
        pane split_direction="horizontal" {
            socktop_pane profile="staging-web"
            socktop_pane profile="staging-db"
        }
    }
}
Use the Layout
zellij --layout socktop-monitoring
WebSocket API Integration
Integrate with the socktop agent’s WebSocket API to build custom monitoring tools.
WebSocket Endpoint
ws://HOST:PORT/ws         # Without TLS
wss://HOST:PORT/ws        # With TLS
With authentication token (if configured):
ws://HOST:PORT/ws?token=YOUR_TOKEN
wss://HOST:PORT/ws?token=YOUR_TOKEN
Request Types
Send JSON messages to request specific metrics:
{"type": "metrics"}       // Fast-changing metrics (CPU, memory, network)
{"type": "disks"}         // Disk information
{"type": "processes"}     // Process list (returns protobuf)
Response Formats
Metrics (JSON)
{
  "cpu_total": 12.4,
  "cpu_per_core": [11.2, 15.7],
  "mem_total": 33554432,
  "mem_used": 18321408,
  "swap_total": 0,
  "swap_used": 0,
  "hostname": "myserver",
  "cpu_temp_c": 42.5,
  "networks": [{"name":"eth0","received":12345678,"transmitted":87654321}],
  "gpus": [{"name":"nvidia-0","usage":56.7,"memory_total":8589934592,"memory_used":1073741824,"temp_c":65.0}]
}
Disks (JSON)
[
  {"name":"nvme0n1p2","total":512000000000,"available":320000000000},
  {"name":"sda1","total":1000000000000,"available":750000000000}
]
Processes (Protocol Buffers)
Processes are returned in protobuf format, optionally gzip-compressed. Schema:
syntax = "proto3";

message Process {
  uint32 pid = 1;
  string name = 2;
  float cpu_usage = 3;
  uint64 mem_bytes = 4;
}

message ProcessList {
  uint32 process_count = 1;
  repeated Process processes = 2;
}
Example: JavaScript/Node.js
const WebSocket = require('ws');

const ws = new WebSocket('ws://localhost:3000/ws');

ws.on('open', function open() {
  console.log('Connected to socktop_agent');

  // Request metrics
  ws.send(JSON.stringify({type: 'metrics'}));

  // Poll every second
  setInterval(() => {
    ws.send(JSON.stringify({type: 'metrics'}));
  }, 1000);

  // Request processes every 3 seconds
  setInterval(() => {
    ws.send(JSON.stringify({type: 'processes'}));
  }, 3000);
});

ws.on('message', function incoming(data) {
  try {
    const jsonData = JSON.parse(data);
    console.log('Received JSON data:', jsonData);
  } catch (e) {
    console.log('Received binary data (protobuf), length:', data.length);
    // Process binary protobuf data with protobufjs
  }
});

ws.on('close', function close() {
  console.log('Disconnected from socktop_agent');
});
Example: Python
import json
import asyncio
import websockets

async def monitor_system():
    uri = "ws://localhost:3000/ws"
    async with websockets.connect(uri) as websocket:
        print("Connected to socktop_agent")

        # Request initial metrics
        await websocket.send(json.dumps({"type": "metrics"}))

        while True:
            # Request metrics
            await websocket.send(json.dumps({"type": "metrics"}))

            # Receive response
            response = await websocket.recv()

            try:
                data = json.loads(response)
                print(f"CPU: {data['cpu_total']}%, Memory: {data['mem_used']/data['mem_total']*100:.1f}%")
            except json.JSONDecodeError:
                print(f"Received binary data, length: {len(response)}")

            await asyncio.sleep(1)

asyncio.run(monitor_system())
Recommended Intervals
- Metrics: ≥ 500ms
- Processes: ≥ 2000ms
- Disks: ≥ 5000ms
Handling Protocol Buffers
For processing binary process data:
- Check if response starts with gzip magic bytes (
0x1f, 0x8b) - Decompress if necessary
- Parse with protobuf library using the schema above
Error Handling
Implement reconnection logic with exponential backoff:
function connect() {
  const ws = new WebSocket('ws://localhost:3000/ws');

  ws.on('open', () => {
    console.log('Connected');
    // Start polling
  });

  ws.on('close', () => {
    console.log('Connection lost, reconnecting...');
    setTimeout(connect, 1000);
  });
}

connect();
More Info
For detailed implementation, see the socktop_agent README.
Socktop Connector Library
The socktop_connector library provides a high-level interface for connecting to socktop agents programmatically.
Overview
The connector library allows you to:
- Build custom monitoring tools - Create your own dashboards and UIs
- Integrate with existing systems - Add socktop metrics to your applications
- Automate monitoring - Script-based system checks and alerts
- WASM support - Use in browser-based applications
Installation
Add to your Cargo.toml:
[dependencies]
socktop_connector = "1.50"
tokio = { version = "1", features = ["full"] }
Quick Start
Basic Connection
use socktop_connector::{connect_to_socktop_agent, AgentRequest, AgentResponse};

#[tokio::main]
async fn main() -> Result<(), Box<dyn std::error::Error>> {
    // Connect to agent
    let mut connector = connect_to_socktop_agent("ws://localhost:3000/ws").await?;

    // Request metrics
    if let Ok(AgentResponse::Metrics(metrics)) = connector.request(AgentRequest::Metrics).await {
        println!("Hostname: {}", metrics.hostname);
        println!("CPU Usage: {:.1}%", metrics.cpu_total);
        println!("Memory: {:.1} GB / {:.1} GB",
                 metrics.mem_used as f64 / 1_000_000_000.0,
                 metrics.mem_total as f64 / 1_000_000_000.0);
    }

    Ok(())
}
With TLS
use socktop_connector::connect_to_socktop_agent_with_tls;

#[tokio::main]
async fn main() -> Result<(), Box<dyn std::error::Error>> {
    let connector = connect_to_socktop_agent_with_tls(
        "wss://secure-host:3000/ws",
        "/path/to/ca.pem",
        false  // Enable hostname verification
    ).await?;

    // Use connector...

    Ok(())
}
Request Types
The connector supports several request types:
Metrics Request
Get comprehensive system metrics:
use socktop_connector::{AgentRequest, AgentResponse};

match connector.request(AgentRequest::Metrics).await {
    Ok(AgentResponse::Metrics(metrics)) => {
        println!("CPU Total: {:.1}%", metrics.cpu_total);

        // Per-core usage
        for (i, usage) in metrics.cpu_per_core.iter().enumerate() {
            println!("Core {}: {:.1}%", i, usage);
        }

        // CPU temperature
        if let Some(temp) = metrics.cpu_temp_c {
            println!("CPU Temperature: {:.1}°C", temp);
        }

        // Memory
        println!("Memory Used: {} bytes", metrics.mem_used);
        println!("Memory Total: {} bytes", metrics.mem_total);

        // Swap
        println!("Swap Used: {} bytes", metrics.swap_used);
        println!("Swap Total: {} bytes", metrics.swap_total);

        // Network interfaces
        for net in &metrics.networks {
            println!("Interface {}: ↓{} ↑{}",
                     net.name, net.received, net.transmitted);
        }

        // GPU information
        if let Some(gpus) = &metrics.gpus {
            for gpu in gpus {
                if let Some(name) = &gpu.name {
                    println!("GPU: {}", name);
                    println!("  Utilization: {:.1}%", gpu.utilization.unwrap_or(0.0));
                    if let Some(temp) = gpu.temp {
                        println!("  Temperature: {:.1}°C", temp);
                    }
                }
            }
        }
    }
    Err(e) => eprintln!("Error: {}", e),
    _ => unreachable!(),
}
Process Request
Get process information:
match connector.request(AgentRequest::Processes).await {
    Ok(AgentResponse::Processes(processes)) => {
        println!("Total processes: {}", processes.process_count);

        for proc in &processes.top_processes {
            println!("PID {}: {} - CPU: {:.1}%, Mem: {} MB",
                     proc.pid,
                     proc.name,
                     proc.cpu_usage,
                     proc.mem_bytes / 1_000_000);
        }
    }
    Err(e) => eprintln!("Error: {}", e),
    _ => unreachable!(),
}
Disk Request
Get disk information:
match connector.request(AgentRequest::Disks).await {
    Ok(AgentResponse::Disks(disks)) => {
        for disk in disks {
            let used = disk.total - disk.available;
            let used_gb = used as f64 / 1_000_000_000.0;
            let total_gb = disk.total as f64 / 1_000_000_000.0;
            let percent = (used as f64 / disk.total as f64) * 100.0;

            println!("Disk {}: {:.1} GB / {:.1} GB ({:.1}%)",
                     disk.name, used_gb, total_gb, percent);
        }
    }
    Err(e) => eprintln!("Error: {}", e),
    _ => unreachable!(),
}
Continuous Monitoring
Monitor metrics in a loop:
use tokio::time::{sleep, Duration};

#[tokio::main]
async fn main() -> Result<(), Box<dyn std::error::Error>> {
    let mut connector = connect_to_socktop_agent("ws://localhost:3000/ws").await?;

    loop {
        match connector.request(AgentRequest::Metrics).await {
            Ok(AgentResponse::Metrics(metrics)) => {
                println!("CPU: {:.1}%, Memory: {:.1}%",
                    metrics.cpu_total,
                    (metrics.mem_used as f64 / metrics.mem_total as f64) * 100.0
                );
            }
            Err(e) => {
                eprintln!("Connection error: {}", e);
                break;
            }
            _ => unreachable!(),
        }

        sleep(Duration::from_secs(2)).await;
    }

    Ok(())
}
Advanced Usage
Custom Configuration
use socktop_connector::{ConnectorConfig, SocktopConnector};

let config = ConnectorConfig {
    url: "ws://server:3000/ws".to_string(),
    token: Some("secret-token".to_string()),
    ca_cert_path: Some("/path/to/ca.pem".to_string()),
    verify_tls: true,
};

let connector = SocktopConnector::connect_with_config(config).await?;
Error Handling
use socktop_connector::{ConnectorError, Result};

async fn monitor() -> Result<()> {
    let mut connector = connect_to_socktop_agent("ws://server:3000/ws").await?;

    match connector.request(AgentRequest::Metrics).await {
        Ok(response) => {
            // Handle response
            Ok(())
        }
        Err(ConnectorError::ConnectionClosed) => {
            eprintln!("Connection closed, attempting reconnect...");
            Err(ConnectorError::ConnectionClosed)
        }
        Err(e) => {
            eprintln!("Error: {}", e);
            Err(e)
        }
    }
}
WASM Support
The connector supports WebAssembly for browser usage:
[dependencies]
socktop_connector = { version = "1.50", features = ["wasm"] }
use socktop_connector::connect_to_socktop_agent;
use wasm_bindgen::prelude::*;

#[wasm_bindgen]
pub async fn monitor_system(url: String) -> Result<JsValue, JsValue> {
    let mut connector = connect_to_socktop_agent(&url)
        .await
        .map_err(|e| JsValue::from_str(&e.to_string()))?;

    match connector.request(AgentRequest::Metrics).await {
        Ok(AgentResponse::Metrics(metrics)) => {
            Ok(JsValue::from_str(&format!("CPU: {:.1}%", metrics.cpu_total)))
        }
        Err(e) => Err(JsValue::from_str(&e.to_string())),
        _ => Err(JsValue::from_str("Unexpected response")),
    }
}
Building Custom Applications
Example: Simple Dashboard
use socktop_connector::*;
use tokio::time::{interval, Duration};

#[tokio::main]
async fn main() -> Result<(), Box<dyn std::error::Error>> {
    let servers = vec![
        ("web", "ws://web.example.com:3000/ws"),
        ("db", "ws://db.example.com:3000/ws"),
        ("cache", "ws://cache.example.com:3000/ws"),
    ];

    let mut connectors = Vec::new();
    for (name, url) in servers {
        match connect_to_socktop_agent(url).await {
            Ok(conn) => connectors.push((name, conn)),
            Err(e) => eprintln!("Failed to connect to {}: {}", name, e),
        }
    }

    let mut tick = interval(Duration::from_secs(2));

    loop {
        tick.tick().await;

        for (name, connector) in &mut connectors {
            if let Ok(AgentResponse::Metrics(m)) = connector.request(AgentRequest::Metrics).await {
                println!("[{}] CPU: {:.1}%, Mem: {:.1}%",
                    name,
                    m.cpu_total,
                    (m.mem_used as f64 / m.mem_total as f64) * 100.0
                );
            }
        }

        println!("---");
    }
}
Example: Alert System
use socktop_connector::*;

async fn check_alerts(mut connector: SocktopConnector) -> Result<(), Box<dyn std::error::Error>> {
    match connector.request(AgentRequest::Metrics).await {
        Ok(AgentResponse::Metrics(metrics)) => {
            // CPU alert
            if metrics.cpu_total > 90.0 {
                eprintln!("ALERT: CPU usage at {:.1}%", metrics.cpu_total);
            }

            // Memory alert
            let mem_percent = (metrics.mem_used as f64 / metrics.mem_total as f64) * 100.0;
            if mem_percent > 90.0 {
                eprintln!("ALERT: Memory usage at {:.1}%", mem_percent);
            }

            // Disk alert
            if let Ok(AgentResponse::Disks(disks)) = connector.request(AgentRequest::Disks).await {
                for disk in disks {
                    let used_percent = ((disk.total - disk.available) as f64 / disk.total as f64) * 100.0;
                    if used_percent > 90.0 {
                        eprintln!("ALERT: Disk {} at {:.1}%", disk.name, used_percent);
                    }
                }
            }
        }
        Err(e) => eprintln!("Error fetching metrics: {}", e),
        _ => {}
    }

    Ok(())
}
Data Types
Key types provided by the library:
Metrics- System metrics (CPU, memory, network, GPU, etc.)ProcessMetricsResponse- Process informationDiskInfo- Disk usage informationNetworkInfo- Network interface statisticsGpuInfo- GPU metricsJournalEntry- Systemd journal entriesAgentRequest- Request typesAgentResponse- Response types
See the crate documentation for complete API reference.
Performance Considerations
The connector is lightweight and efficient:
- Protocol Buffers - Efficient binary serialization
- Gzip compression - Reduced bandwidth usage
- Async I/O - Non-blocking operations
- Connection reuse - Single WebSocket for multiple requests
Typical resource usage:
- Memory: ~1-5 MB per connection
- CPU: < 0.1% during idle
- Bandwidth: ~1-5 KB per metrics request
Troubleshooting
Connection Errors
match connect_to_socktop_agent(url).await {
    Err(ConnectorError::ConnectionFailed(e)) => {
        eprintln!("Connection failed: {}", e);
        // Retry logic here
    }
    Err(ConnectorError::InvalidUrl) => {
        eprintln!("Invalid URL format");
    }
    Err(e) => eprintln!("Other error: {}", e),
    Ok(conn) => { /* Success */ }
}
TLS Errors
// Disable TLS verification for testing (not recommended)
use socktop_connector::{ConnectorConfig, SocktopConnector};

let config = ConnectorConfig {
    url: "wss://server:3000/ws".to_string(),
    verify_tls: false,
    ..Default::default()
};
Examples Repository
More examples available in the socktop repository:
examples/simple_monitor.rs- Basic monitoringexamples/multi_server.rs- Monitor multiple serversexamples/alert_system.rs- Threshold-based alertsexamples/wasm_demo/- Browser-based monitoring
API Reference
Full API documentation: docs.rs/socktop_connector
Next Steps
- Agent Direct Integration - Embed agent in your app
- General Usage - Using the TUI client
- Configuration - Configuration options